Perfect Maida Chapati Recipe: Thin, Soft, and Delicious
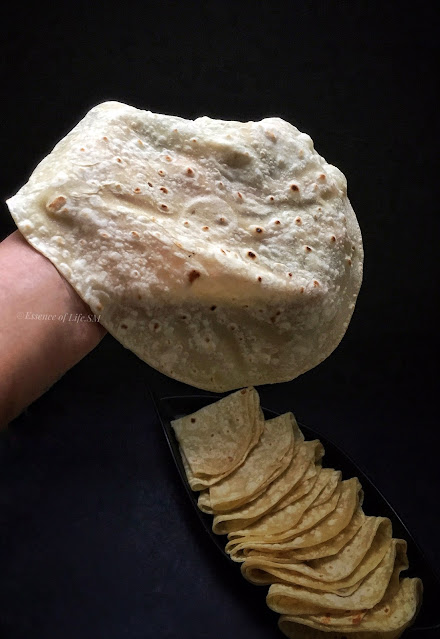
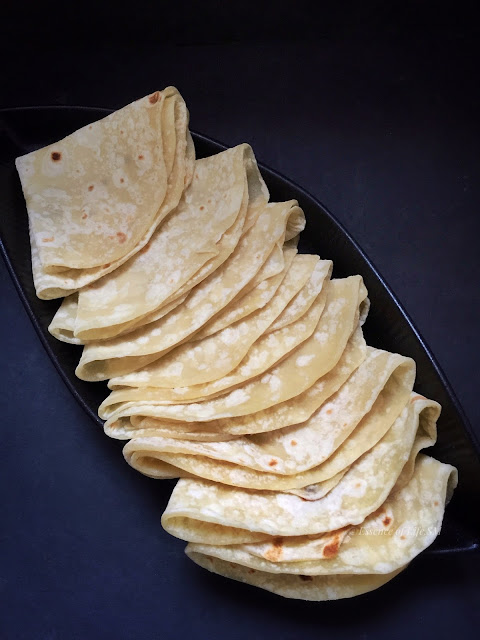
Discover one of the most popular recipes on my blog, "Essence of Life - Food." This Maida Chapati recipe is a personal favourite and a hit among guests. Made perfectly thin and soft, these chapatis are a delightful twist on traditional Indian flatbread.
The Significance of Bread in Indian Cuisine
Western countries boast a rich bread culture, with each nation having its unique bread. While Asia is predominantly rice-based, India presents a balanced culinary scene with both Roti (bread) and Rice as staples. Wheat and rice are central to Indian diets, creating a diverse food culture. Despite our expertise in bread-making, Indian breads often go uncelebrated compared to their international counterparts.
Chapati: The Quintessential Indian Bread
Among the myriad of Indian breads, Chapati stands out as the foundation of all Rotis & Parathas. No Indian meal is complete without this essential flatbread. Traditionally made with finely milled whole wheat flour, Chapati is also known as Pulka or Roti. However, this recipe offers a unique twist by using all-purpose flour, known as Maida in India. Aside from my Mom, I've never known anyone else in our circle who makes these Maida Chapatis at home.
The Debate Around Maida
In recent years, Indian households have shied away from Maida due to concerns over bleaching agents and health impacts. Despite the scepticism, I remain loyal to traditional recipes that call for Maida. I believe in preserving the authenticity of dishes like cakes and Malabar Parotta, which are best made with all-purpose flour.
Maida/All-purpose Flour in Indian and Central Asian Cuisine
Maida is extensively used in Indian and Central Asian cuisines. It is the key ingredient in various flatbreads such as Naan, Kulcha, Tandoori Roti, Parotta, Romali Roti are made using Maida. Deep-fried breads like Batura, Puri, and Luchi are also made with Maida. These breads hold a significant place in Indian cuisine, rivalling the importance of rice.
Preparing the Perfect Maida Chapati
To make Maida Chapati, you will need:
- All-purpose flour (Maida), salt, and water.
- Knead the ingredients into a soft dough and let it rest for 10–15 minutes to develop gluten. Form the dough into small balls, flatten them, and roll them out into circles using a rolling pin (Belan) on a rolling board (Chakla).
For best results, use good quality Maida and ensure the dough is well-kneaded and rested. This makes the Chapatis soft, fluffy, and delicious. Rolling them into perfect rounds is a feat that can be acquired by practice. It is equally one of the easiest yet tricky dishes to prepare in terms of shape and softness.
There are also automatic roti makers available on the market that automate the whole process. Even rolling these Maida Chapatis becomes easy with Chapati pressing machines. These Maida Chapatis tend to spring back to size when rolled, so make sure to roll out slightly bigger than normal Chapatis.
Cooking Maida Chapati
Cook the rolled-out dough on a preheated tava or griddle, turning until both sides are done. Avoid using oil or ghee if you prefer non-greasy Chapatis. These Chapatis remain soft even the next day, making them a great addition to daily menus.
Tips for Beginners
This recipe is beginner-friendly. Use water at room temperature and add a few teaspoons of oil while kneading. Let the dough rest for 8–10 minutes to allow the gluten to develop, resulting in soft and nutritious Chapatis. My neighbour aunty whom we call Mami, once shared a valuable tip: the key to soft Chapatis lies in allowing the dough to prove for at least 8–10 minutes.
Discover the Secret to Soft, Delicious Chapatis That Stay Fresh Even the Next Day
I learned to make Chapati early on and perfected it through practice. And the most crucial step, my secret tip for perfect texture and softness, is adding flour to water instead of water to flour. This personal technique ensures the best results for making soft, delicious Maida Chapatis. It's a foolproof recipe in my kitchen, loved by my family, especially my kids. When you're bored by regular Chapatis, try this Maida variation for a delightful change.
For a detailed recipe on Chapati with Atta/ Whole Wheat Flour, click here...
Difficulty - Medium
Serves - 4
Yields - 15 Chapatis
Author - SM
Preparation Time - 5–10 Minutes
Leavening Time - 10–30 Minutes - 1 Hour
Cooking Time - 20–30 Minutes
Explore a wide range of exquisite Indian Bread Recipes, here...
Mastering the Art of Maida Chapati: A Family Favourite
Fluffy Maida Chapati- All Purpose Flour Chapati |
Perfect Maida Chapati Recipe: Thin, Soft, and Delicious
Understanding Maida/All-purpose Flour
Maida is made from wheat, finely milled without any bran, refined, and bleached. It is prepared from the endosperm, the starchy white part of the wheat grain, making it rich in carbohydrates and sugar. The milling process separates the bran and germ, resulting in a white, protein-rich flour. Despite being low in protein and fibre, Maida is highly extensible and stretchable, making it ideal for various Indian breads, pastries, and baked goods.
Ingredients:
Maida/All-purpose Flour: 3 CupsWater: 1¼ Cups (Approximately)
Salt: To Taste
Sugar: 3–4 Teaspoons (Optional)
Oil: 2–3 Tablespoons
Method:
Kneading the Dough
- Take 1¼ cups of water in a large bowl.
- Add a dash of salt and optional sugar to the water.
- Drizzle a few teaspoons of oil over the water and mix well.
- Add 3 cups of Maida to the water mixture.
- Mix until no visible water remains, but do not knead at this point.
- Knead the mixture until it becomes smooth and soft, approximately 8–10 minutes.
- Cover the bowl and let the dough rest for 30 minutes.
Notes:
- Mixing Method: Add flour to the water mixture to retain the softness of the Chapatis.
- Water Ratio: Use approximately 1¼ cups of water for 3 cups of Maida, adjusting based on the flour quality.
- Kneading: Dip your fist in water if more moisture is needed and continue kneading for a softer & more pliable dough.
Resting the Dough
- Cover the Dough: Wrap the well-kneaded dough with a wet kitchen towel, cling film, or plastic wrap, or cover the bowl tightly with a lid.
- Let the dough rest for at least 8–10 minutes for the gluten to develop. For best results, rest for up to an hour, especially in cold weather.
Notes:
- Moisture: Covering the dough traps moisture, preventing it from drying out.
- Texture: Resting time tenderizes the dough, giving it a soft and springy texture.
Rolling the Dough
- Divide and Roll: Divide the dough into equal portions and roll each portion into medium-sized, thin circles.
Notes:
- Roll the dough slightly larger than normal Chapatis as Maida Chapatis tend to spring back.
- Dust the rolling board with dry flour or well-powdered rice flour to prevent sticking and ensure soft Chapatis.
- Do not use too much flour while you roll the dough. Chapatis tend to become hard if you use more flour on either side of the dough when rolling them.
Fluffy Maida Chapati- All Purpose Flour Chapati |
Cooking the Maida Chapatis
Heat the Tava/Griddle:
- Heat a Tava/Griddle on a high flame, then lower the flame before placing the rolled Chapatis on it.
Cook the Chapatis:
- Wait for the colour to change slightly and the Chapatis to fluff up.
- Flip and cook the other side until brown crispy spots appear.
- Remove from the Tava/Griddle and place on a plate lined with a clean kitchen towel.
Serving Suggestions:
- Stack the Chapatis, cover with the kitchen towel, and just before serving, smear with oil, butter, or ghee.
- Serve hot with your choice of vegetarian or non-vegetarian side dishes or Raithas.
Fluffy Maida Chapati- All Purpose Flour Chapati |
Notes & Tips:
- Temperature Control: Do not overheat the Tava/Griddle while cooking.
- Condensation: Kitchen towels absorb moisture, preventing the Chapatis from getting soggy.
- Storage: For later use, store Chapatis in an insulated casserole lined with a kitchen towel to maintain softness.
This Maida Chapati recipe is truly foolproof, ensuring soft and pliable flatbreads that remain tender even the next day. It's a family favourite and a standout on my blog, consistently drawing rave reviews for its simplicity and deliciousness. Perfect for beginners and seasoned cooks alike, this recipe embodies the versatility and charm of Indian bread-making, making it an all-time popular choice among my readers. Give it a try and see why it's a staple in our home and a star on my blog - Essence of Life - Food.