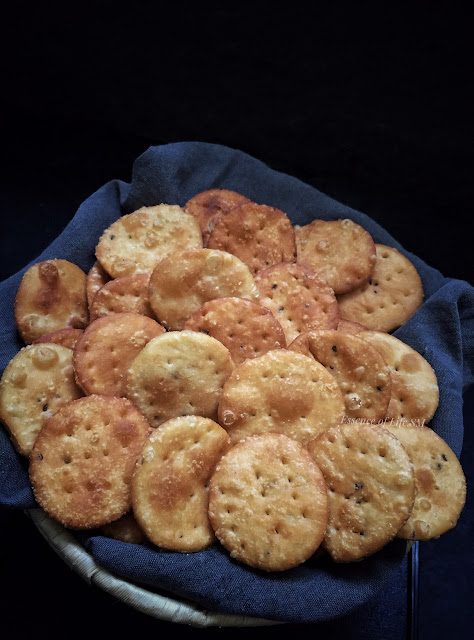
 |
| PAPDI/PAPRI |
Indian Chaat Recipes are so versatile, and it has its own fan following throughout the length & breadth of the Country, and across the country. Looking into the long list of items needed for Chaat items, certain combination of snacks, vegetables, seasoning & unique chutneys make each Chaat Item unique to itself. Though the taste & ingredients & consistency of certain Chaat Items change regionally, most of the items added into these sinfully crazy Indian Street Food sticks to the norm and one such Item is Papdi. Papdi is one of the most essential components of Chaat recipes of India. Papdis are nothing but deep-fried small crispy flat roundels which gives a crunchy texture to the dish.
When we talk about Indian Street Food, Chaat Items are sure to steal the show. With innumerable varieties & combos — Pani Puri, Bhel Puris, Papdi Chaat, Dahi Puri, Sev Puri, Pav Bhaji, the list gets longer & longer…. When I started frequenting with Chaat Items at home, one reason behind making Chaat Recipes at home is, we do not get Chaat locally. And least to mention we do not get any of the snacks needed for Chaat too. I stock them up when I travel to Kuala Lumpur or Singapore. When a craving for Chaat Items takes a sweep I have to go to the extent of making each & every item needed for making these Chaat Items like Papdi, Puri, Boondhi, Sev. Then Green Chutney, Tamarind Dates Chutney, Pani for Pani Puri etc., & etc., Long & tiring process, I started converting Papdis into Namak Pare in terms of easing the process. It helped me to store it for a longer time.
Papdi is one good add-on which can be crushed and added into Bhel Puris or can be used to make Papdi Chaat or Dahi Papdi Chaat with a hearty drizzle of thick Yogurt/Curd, seasoning and toppings, Sev Puri etc. On the other hand, it can be eaten as a snack.
The process of making this snack is an easy one except for the cutting and frying portion & it needs a bit of time & patience. The trick to making crunchy Papdi is to knead the dough as tightly as you can. Then it should be rolled out like we do for a Chapati, it shouldn't be rolled too thin or too thick. It should be rolled to a normal thickness, and then we need to prick it all over with a fork. This is to avoid Papdi fluffing up while frying, which can make Papdi soft when cooled down. Then Papdis should be fried on medium-low heat. The amount of ghee & semolina added to the flour while kneading makes Papdi deliciously crunchy. The Carom Seeds/Ajwain is what gives a nice soothing flavour to the Papdi & also helps in digestion.
Points to remember for crispy Papdi/Papri:
- The dough should be slightly stiffer.
- The dough should be rolled neither too thick nor too thin. It should be rolled to a normal thickness.
- Prick all over the rolled dough with a fork. This is to avoid Papdi fluffing up while frying, which can make Papdi soft when cooled down.
- Cut it out into small roundels with a Cookie Cutter or a sharp edged Bowl/Katori.
- Fry Papdis on a medium-low flame until it turns into Golden Colour.
For more CHAAT RECIPES, click here…
Cuisine — North Indian
Recipe Type — Snacks
Spice Level — Low
Difficulty — Medium
Author — SM
Preparation Time — 25-30 Minutes
Cooking Time - 30 -45 Minutes
For more recipes on SNACKS & SAVOURIES, click here…
HOW TO MAKE PAPDI/PAPRI FOR CHAAT
 |
| PAPDI/PAPRI |
INGREDIENTS:
For Papdi:
All-purpose Flour(Maida) — 2 Cups
Baking Soda — 1/4 Tspn
Salt — To Taste
Carom Seeds(Ajwain) — 1 Tspn
Cumin Seeds — 1/2 Tspn(Optional)
Oil/Ghee — 2-3 Tbspn
Water — 1/2-3/4 Cup(Approximately)
For Frying:
Oil
METHOD:
For the Dough:
- Sieve the All-purpose Flour (Maida) along with baking soda & salt once.
- Add Carom Seeds(Ajwain), Cumin Seeds to the sieved flour and give a quick stir.
- Pour in the Oil/Ghee.
- Add little water at a time and knead it into a slightly stiffer dough.
- Add water at intervals. Do not pour in all the water at a time.
- I used approximately a little lesser than 3/4 Cup of Water.
- Amount of water required depends on the quality of the flour.
- The dough should be slightly stiffer.
For Papdi/Papri:
- Divide the Dough into 3 Balls and keep them aside.
- Dust the Dough Balls with some All-Purpose Flour and roll it out into a flat, neither too thin nor thick circle.
- Prick all over the rolled dough with a fork.
- Cut the rolled dough into small roundels with a cookie cutter or a sharp edged Bowl/Katori.
- Transfer the Cut Papdis into a plate dusted with All-Purpose Flour.
- Follow suit for the rest of the dough balls.
For Deep Frying:
- Heat oil in a Deep Pan or a Wok.
- Once the oil becomes hot, reduce the flame to medium-low.
- Gently drop the Papdis into the Oil.
- Fry the Papdis on a low- medium flame until it turns into Golden Colour.
- Once done, remove the fried Papdis with slotted spoons from the oil.
- Drain them on Paper towels
- Once cooled down, store them in airtight containers.
- If stored properly, it may last up to a week to 10 days.
Baking Papdis In an Oven:
- Follow the steps as above until cutting the Papdis.
- Preheat an Oven at 160 °C.
- Spray the baking tray with oil.
- Line it up with the Papdis.
- Bake it in the preheated Oven at 160 °C for about 25–30 Minutes.
NOTES:
- Can substitute half the amount of All-purpose Flour with Wheat Flour(Aata).
- Some recipes even call for adding a few teaspoons of Semolina while kneading the dough.
- The dough should be stiff, which is the main factor behind crispy Papdis.
- Can use Ghee/Oil for the recipe. Both work equally well.
- Don’t roll it too thin. Roll it as you do it for Chapati, but slightly thicker.
- Prick all over the rolled dough with a fork.
- Cut the rolled circles into small roundels with a cookie cutter or sharp edged bowl/Katori.
- Fry the Papdis on a low- medium flame until it turns into Golden Colour.


